목표
Riverpod을 통해서 Todo 앱을 만든다. 만드는 과정에 대해서 이해하고 각 provider가 어떤 역할을 하는지 알아본다.
Github에 관련된 많은 자료들을 보다보면 상태관리 라이브러리중 가장 많이 보는 것이 GetX와 Riverpod라고 할 수 있다. GetX는 가장 많이 알려져 있긴 하지만, 일단 업데이트가 진행되지 않고 있기도 하고 (2023-04-13 기준), Riverpod은 flutter의 provider를 대체할 수 있을 정도로 꾸준히 발전되고 있다보니 저자는 Riverpod을 더욱 공부해보아야겠다는 생각이 들었다.
Riverpod 공식 사이트 (https://riverpod.dev/ko/docs/getting_started)에 있는 에제들을 함께 따라해보고 새롭게 재해석도 해보면서 Riverpod을 잘다룰 수있도록 하는 것이 2023.04월의 목표이다. 05월 부터는 다른것에 더욱 집중 할 수 있기를 바라며, 그럼 Riverpod으로 Todo앱 만들기를 시작해본다.
참고: https://github.com/rrousselGit/riverpod/tree/master/examples/todos
1. dependency 준비하기
dependencies:
  flutter:
    sdk: flutter


  # The following adds the Cupertino Icons font to your application.
  # Use with the CupertinoIcons class for iOS style icons.
  cupertino_icons: ^1.0.2

  # flutter_hooks와 Riverpod을 병용한 패키지
  flutter_hooks: ^0.18.6

  # flutter_hooks와 Riverpod을 병용한 패키지
  hooks_riverpod: ^2.3.4

  # flutter에 관련된 모든 클래스가 완전제거된 Riverpod 패키지
  riverpod: ^2.3.4
  uuid: ^3.0.4
2. 파일 생성
- main.dart
- todo.dart
3. todo.dart
todo 앱에서 어떤 기능을 구현할지 담당하는 파일이다. 순서대로 서술이 되어 있으며, 주석을 참고하면 더욱 이해하기 쉽다.
// immutable 어노테이션을 import 하기 위한 코드
// immutable이란 클래스를 불변하게 만들어주는 어노테이션이다.
// 불변화는 Flutter의 성능을 최적화하는데 오뭉디 되기 위함이며, Flutter에서 UI 구조 변경시 UI 트리
// 전체를 빌드하기 때문에 구성요소의 불변성을 통해 리빌드라는 불필요한 작업을 피할 수 있다.
import 'package:flutter/foundation.dart' show immutable;

import 'package:flutter/rendering.dart';
import 'package:riverpod/riverpod.dart';
import 'package:uuid/uuid.dart';

// 소프트웨어 시스템에서 객체 식별을 위한 표준 식별자 uuid
const _uuid = Uuid();

// Todo 클래스를 정의 하며, 클래스 내 id, description, completed라는 세가지 속성을 가진다.
// completed는 기본값으로 false로 지정이된다.
// immutable이 표기 되어 있으므로 인스턴스는 생성 후 변경이 불가능한 불변 객체로 취급된다.
// description과 id를 속성 필 수 인자로 받는다. completed는 선택적 매개변수다.
@immutable
class Todo {
  const Todo(
      {required this.description, required this.id, this.completed = false});

  final String id;
  final String description;
  final bool completed;

  // Todo 객체를 문자열로 표현하기 위해서 description과 completed를 문자열로 표현 및 반환한다.
  @override
  String toString() {
    return 'Todo(description: $description, completed: $completed)';
  }
}

// TodoList의 상태 관리 클래스를 정의 한다.
// TodoList 클래스는 StateNotifier 클래스를 상속하며, List<Todo> 타입의 상태관리를 한다.
// 생성자 초기 Todo 리스트를 전달한다.
class TodoList extends StateNotifier<List<Todo>> {
  TodoList([List<Todo>? initialTodos]) : super(initialTodos ?? []);

  // add 메소드는 description 문자열 인자로 받으며, 새로운 Todo 객체를 생성
  // 상태업데이트를 제공한다.
  void add(String description) {
    state = [
      ...state,
      Todo(
        id: _uuid.v4(),
        description: description,
      ),
    ];
  }

// toggle 메소드 정의한다. id를 문자열로 받으며 id와 일치하는 Todo객체의 completed 속성 값을
// 토글한다. toggle 메소드는 state 변수의 값을 업데이트 하여 completed 속성 값을 변경한다.
// state 변수는 List<Todo> 타입 상태를 가진다.
  void toggle(String id) {
    state = [
      // for 루프를 사용하여 새로운 List<Todo> 객체를 생성한다.
      // for 루프는 state 리스트의 모든 요소를 반복하며, if 조건문의 현재 요소 id 속성이
      // 인자로 전달된 id와 일치하는지 확인한다. 이를 통해 completed의 속성값을 변화 혹은 유지한다.
      // 즉 해당 토글은 Todo 객체 완료 여부를 토글하기 위해 만들어졌다.
      for (final todo in state)
        if (todo.id == id)
          Todo(
            id: todo.id,
            completed: !todo.completed,
            description: todo.description,
          )
        else
          todo,
    ];
  }

  /// edit 메소드는 id와 description 문자열을 인자로 받으며, id와 일치하는 Todo 객체의
  /// description 값을 변경한다. state 변수 값을 업데이트하여 description 속성값을 변경한다.
  /// for 루프를 통해 List<Todo>객체를 생성하며, if 조건문의 id 속성이 인자로 전달된 id와 일치
  /// 하는지 확인한다.
  void edit({required String id, required String description}) {
    state = [
      for (final todo in state)
        if (todo.id == id)
          Todo(
            id: todo.id,
            completed: todo.completed,
            description: todo.description,
          )
        else
          todo,
    ];
  }

  /// target이라는 Todo 객체를 인자로 받아 state 변수의 해당객체를 제거한다.
  /// where 메소드를 이용해 id 속성이 인자로 전달된 target.id와 일치하지 않는 요소를 필터링해,
  /// toList 메소드를 이용하여 남은 요소들을 새로운 리스트로 변환하는 역할을 한다.
  void remove(Todo target) {
    state = state.where((todo) => todo.id != target.id).toList();
  }
}
4. main.dart
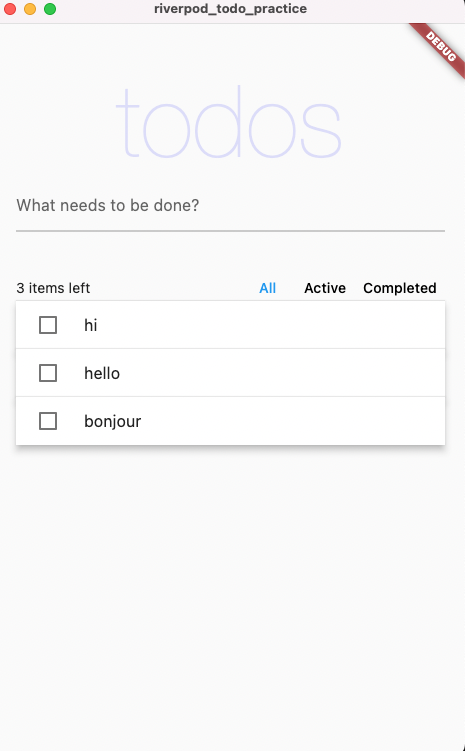
UI 구성을 하는 부분이다. 생각보다 길이가 길다보니 하나씩 뜯어보면서 설명을 해보아야겠다. 실제 화면을 구동해보면 이렇게 나타난다.
4-1. package import 부분
import 'package:flutter/material.dart';
import 'package:flutter_hooks/flutter_hooks.dart';
import 'package:hooks_riverpod/hooks_riverpod.dart';

import 'todo.dart';
flutter_hooks. 위젯의 상태와 효과를 관리하기에 유용하다.
riverpod. 앱 전체의 상태관리를 위한 패키지이다.
4-2. 기능 구현을 위한 고유의 키의 할당
final addTodoKey = UniqueKey();
final activeFilterKey = UniqueKey();
final completedFilterKey = UniqueKey();
final allFilterKey = UniqueKey();
위젯 별 UniqueKey()함수를 사용하여 각각의 변수에 고유 키를 할당하고 있다.
4-3. StateNotifierProvider를 사용한 TodoList 클래스의 List<Todo>타입 상태 관리
final todoListProvider = StateNotifierProvider<TodoList, List<Todo>>((ref) {
  return TodoList(const [
    Todo(id: 'todo-0', description: 'hi'),
    Todo(id: 'todo-1', description: 'hello'),
    Todo(id: 'todo-2', description: 'bonjour'),
  ]);
});
TodoList 클래스는 const 생성자를 사용하여 Todo 객체 3개를 초기에 반환하고 있다.
4-4. TodoListFilter 열거형(enum) 코드 정의
enum TodoListFilter {
  all,
  active,
  completed,
}
특정 유한한 값들을 가지는 데이터 타입이며, all, active, completed 총 3개로 구성되어 있는 값이다. 일반적으로 Todo 리스트의 필터링을 구현하는데 사용이 된다.
4-5. riverpod 패키지를 사용하여 Todo 리스트 앱에 필요한 상태관리용 Provider 객체 생성
final todoListFilter = StateProvider((_) => TodoListFilter.all);

final uncompletedTodosCount = Provider<int>((ref) {
  return ref.watch(todoListProvider).where((todo) => !todo.completed).length;
});

final filteredTodos = Provider<List<Todo>>((ref) {
  final filter = ref.watch(todoListFilter);
  final todos = ref.watch(todoListProvider);

  switch (filter) {
    case TodoListFilter.completed:
      return todos.where((todo) => todo.completed).toList();
    case TodoListFilter.active:
      return todos.where((todo) => !todo.completed).toList();
    case TodoListFilter.all:
      return todos;
  }
});
stateProvider는 TodoListFilter.all 값을 초기 상태로 가져 Todo 리스트의 필터링 기능을 구현할 때 사용됩니다. Provider는 uncompletedTodosCount와 filteredTodos로 두개의 Provider가 생성이 되어있으며, 각각 완료된 항목과 완료되지 않은 Todo 항목의 개수를 계산하는 Provider 입니다. ref.watch() 함수를 사용하여 todoListProvider와 todoListFilter를 관찰하고 있으며, switch 문을 사용하여 선택된 필터링 조건에 따라 Todo 항목들을 필터링 하여 반환합니다.
4-6. UI 빌드 시작
void main() {
  runApp(const ProviderScope(child: MyApp()));
}

class MyApp extends StatelessWidget {
  const MyApp({Key? key}) : super(key: key);

  @override
  Widget build(BuildContext context) {
    return const MaterialApp(
      home: Home(),
    );
  }
}
Material Design 기반 앱을 만들기 위한 Widget을 정의 하고 있다.
4-7. TodoList 앱의 Home 화면을 구성하는 클래스
class Home extends HookConsumerWidget {
  const Home({Key? key}) : super(key: key);

  @override
  Widget build(BuildContext context, WidgetRef ref) {
    final todos = ref.watch(filteredTodos);
    final newTodoController = useTextEditingController();

    return GestureDetector(
      onTap: () => FocusScope.of(context).unfocus(),
      child: Scaffold(
        body: ListView(
          padding: const EdgeInsets.symmetric(horizontal: 20, vertical: 40),
          children: [
            const Title(),
            TextField(
              key: addTodoKey,
              controller: newTodoController,
              decoration: const InputDecoration(
                labelText: 'What needs to be done?',
              ),
              onSubmitted: (value) {
                ref.read(todoListProvider.notifier).add(value);
                newTodoController.clear();
              },
            ),
            const SizedBox(height: 42),
            const Toolbar(),
            if (todos.isNotEmpty) const Divider(height: 0),
            for (var i = 0; i < todos.length; i++) ...[
              if (i > 0) const Divider(height: 0),
              Dismissible(
                key: ValueKey(todos[i].id),
                onDismissed: (_) {
                  ref.read(todoListProvider.notifier).remove(todos[i]);
                },
                child: ProviderScope(
                  overrides: [
                    _currentTodo.overrideWithValue(todos[i]),
                  ],
                  child: const TodoItem(),
                ),
              )
            ],
          ],
        ),
      ),
    );
  }
}
Home 클래스는 HookConsumerWidget을 상속하며, WidgetRef를 이용하여 상태관리를 진행한다. 여기서 HookConsumerWidget은 Hook을 이용하여 상태를 관리하는 위젯이다.
build 메소드는 filteredTodos를 통해 현재 필터링된 할일 목록을 가져온다. useTextEditingController를 이용하여 새로운 할일을 입력받을 수 있는 위젯을 만들고, onsubmitted 콜백을 이용하여 새로운 할일을 추가한다.
Toolbar 위젯을 통해 현재 할일 목록을 필터링하고 todos 리스트에 따라 TodoItem을 생성한다. Dismissible을 이용하여 TodoItem 위젯을 삭제할 수도 있다. ProviderScope를 이용하여 todos[i]에 대한 상태를 TodoItem 위젯에 전달 한다.
GestureDetctor와 Scaffold 위젯으로 UI를 만드는데 GestureDetector는 화면 터치시 포커스를 해제하는 역할이다.
4-8. 할 일 목록에서 필터링 도구 만들기
class Toolbar extends HookConsumerWidget {
  const Toolbar({
    Key? key,
  }) : super(key: key);

  @override
  Widget build(BuildContext context, WidgetRef ref) {
    final filter = ref.watch(todoListFilter);

    Color? textColorFor(TodoListFilter value) {
      return filter == value ? Colors.blue : Colors.black;
    }

    return Material(
      child: Row(
        mainAxisAlignment: MainAxisAlignment.spaceBetween,
        children: [
          Expanded(
            child: Text(
              '${ref.watch(uncompletedTodosCount)} items left',
              overflow: TextOverflow.ellipsis,
            ),
          ),
          Tooltip(
            key: allFilterKey,
            message: 'All todos',
            child: TextButton(
              onPressed: () =>
                  ref.read(todoListFilter.notifier).state = TodoListFilter.all,
              style: ButtonStyle(
                visualDensity: VisualDensity.compact,
                foregroundColor:
                    MaterialStateProperty.all(textColorFor(TodoListFilter.all)),
              ),
              child: const Text('All'),
            ),
          ),
          Tooltip(
            key: activeFilterKey,
            message: 'Only uncompleted todos',
            child: TextButton(
              onPressed: () => ref.read(todoListFilter.notifier).state =
                  TodoListFilter.active,
              style: ButtonStyle(
                visualDensity: VisualDensity.compact,
                foregroundColor: MaterialStateProperty.all(
                  textColorFor(TodoListFilter.active),
                ),
              ),
              child: const Text('Active'),
            ),
          ),
          Tooltip(
            key: completedFilterKey,
            message: 'Only completed todos',
            child: TextButton(
              onPressed: () => ref.read(todoListFilter.notifier).state =
                  TodoListFilter.completed,
              style: ButtonStyle(
                visualDensity: VisualDensity.compact,
                foregroundColor: MaterialStateProperty.all(
                  textColorFor(TodoListFilter.completed),
                ),
              ),
              child: const Text('Completed'),
            ),
          ),
        ],
      ),
    );
  }
}
Toolbar 클래스는 HookConsumerWidget을 상속하며, build 메소드 안에 구현된다. Toolbar 위젯은 상태를 쓰고 읽는 ref 매개 변수를 사용하여 할 일 목록 필터링을 관리한다.
현재 Row 위젯을 사용하여 툴바의 모든 위젯을 나란히 배치를 하고 있으며, Expanded 위젯을 사용하여 남은 할 일 항목 수를 보여주는 Text 위젯 영역의 크기를 조절한다.
Tooltip위젯과 TextButton 위젯의 경우 All, Active, Completed 필터링 버튼을 만든다. 이 버튼들은 각각 todoListFilter의 새로운 값을 가져오며 해당 필터링 버튼 선택된 상태에 따라 글씨의 색이 변하게 된다. 마우스 포인터를 올려보면 message를 통해 설명도 나오게 만들어 놓았다. 버튼을 누를시에는 todoListFilter 값을 변경하여 해당 필터링으로 할 일 목록을 필터링한다.
4-9. 타이틀 만들기
class Title extends StatelessWidget {
  const Title({Key? key}) : super(key: key);

  @override
  Widget build(BuildContext context) {
    return const Text(
      'todos',
      textAlign: TextAlign.center,
      style: TextStyle(
        color: Color.fromARGB(38, 47, 47, 247),
        fontSize: 100,
        fontWeight: FontWeight.w100,
        fontFamily: 'Helvetica Neue',
      ),
    );
  }
}
말그대로 타이틀을 말하는 것이다. 문자열을 중앙에 정렬하여 화면에 표시하는 StatelessWidget을 정의한다.
4-10. 할일 목록의 항목을 나타내는 TodoItem 위젯 구현
final _currentTodo = Provider<Todo>((ref) => throw UnimplementedError());

class TodoItem extends HookConsumerWidget {
  const TodoItem({Key? key}) : super(key: key);

  @override
  Widget build(BuildContext context, WidgetRef ref) {
    final todo = ref.watch(_currentTodo);
    final itemFocusNode = useFocusNode();
    final itemIsFocused = useIsFocused(itemFocusNode);

    final textEditingController = useTextEditingController();
    final textFieldFocusNode = useFocusNode();

    return Material(
      color: Colors.white,
      elevation: 6,
      child: Focus(
        focusNode: itemFocusNode,
        onFocusChange: (focused) {
          if (focused) {
            textEditingController.text = todo.description;
          } else {
            ref
                .read(todoListProvider.notifier)
                .edit(id: todo.id, description: textEditingController.text);
          }
        },
        child: ListTile(
          onTap: () {
            itemFocusNode.requestFocus();
            textFieldFocusNode.requestFocus();
          },
          leading: Checkbox(
            value: todo.completed,
            onChanged: (value) =>
                ref.read(todoListProvider.notifier).toggle(todo.id),
          ),
          title: itemIsFocused
              ? TextField(
                  autofocus: true,
                  focusNode: textFieldFocusNode,
                  controller: textEditingController,
                )
              : Text(todo.description),
        ),
      ),
    );
  }
}
_currentTodo라는 Provider를 선언한다. 이는 현재 선택된 Todo 항목을 나타내기 위함이다. TodoItem 위젯을 구현시 HookConsumerWidget을 상속하며, ref.watch(_currentTodo)를 호출하여 현재 선택된 객체를 가져오고 있다.
useFocusNode() 훅을 사용하여 Todo 항목의 포커스 노드와 포커스 여부등을 가져온다. Todo 항목 편집시 포커스의 설정 그리고 포커스를 잃을 시 항목을 저장하도록 한다. 바로 아래의 코드가 이를 위함이다.
onFocusChange: (focused) {
          if (focused) {
            textEditingController.text = todo.description;
          } else {
            ref
                .read(todoListProvider.notifier)
                .edit(id: todo.id, description: textEditingController.text);
          }
        },
그리고 useTextEditingController() 훅을 사용하여 텍스트 입력 필드의 컨트롤러를 가져오며 이는 편집을 위함이다. 이제 ListTile 위젯에서 항목들을 나타내고 체크박스와 텍스트등을 표시한다.
4-11. useIsFocused의 구현
bool useIsFocused(FocusNode node) {
  final isFocused = useState(node.hasFocus);

  useEffect(
    () {
      void listener() {
        isFocused.value = node.hasFocus;
      }

      node.addListener(listener);
      return () => node.removeListener(listener);
    },
    [node],
  );

  return isFocused.value;
}
useIsFocused 함수는 node라는 FocusNode 객체를 입력 받는다. 그리고 useState Hook을 사용해서 isFocused 변수와 setState 함수를 선언한다.
useEffect 훅은 node 객체의 포커스가 변경시, isFocused 변수를 업데이트 하기 위해 사용된다. useEffect 훅은 함수형 컴포넌트가 렌더링이 된 후에 실행이 되며, node.addListener 메소드는 node 객체에 이벤트 리스너를 등록한다. node 객체 포커스 여부가 변경될때 마다 실행이 되며, return 문의 removeListener 메소드를 사용하여 이벤트 리스너를 제거한다.
isFocused 변수값을 반환함으로써 FocusNode 객체의 포커스 여부를 추적한다.
포커스라고 하는 것은 사용자가 현재 입력하거나 상호작용할 수 있는 위젯을 나타내기 위한 시각적인 표시와 이벤트 처리등을 일컫는다. 포커스를 가진 위젯은 해당 위젯의 모든 이벤트를 수신하고 처리가 가능하다.
지금까지가 riverpod과 hook을 이용한 todolist 앱의 작성이다. 여기서 더 확장할 수도 아니면 조금 더 깊게 해석함으로써, 추후 다른 방법으로 사용이 가능할 것이다. 다음에는 서드파티를 이용한 예제를 해석해보면서 코드의 구성을 공부해보고자 한다.
'Flutter' 카테고리의 다른 글
| 5-4. Riverpod (QuizApp) (0) | 2023.04.18 |
|---|---|
| 5-3. Riverpod (WeatherApp) (0) | 2023.04.17 |
| [Practice] Todolist 만들기2 (0) | 2023.04.13 |
| 11-2. BLoC과 freezed (0) | 2023.04.11 |
| 11-1. BLoC의 구조 (상세) (0) | 2023.04.10 |